Basic recorder settings
What are basic recorder settings?
Portable recorders have a variety of settings and functions to help you record different kinds of sounds for different purposes. This guide explains basic settings for recording interviews and wild sound.
How can effectively using basic recording settings help me serve my listeners better?
- Listeners will hear clear, high-quality recordings.
- Setting your recorder settings properly prior to going to the field will ensure that farmers’ voices are heard loud and clear on air.
How can effectively using basic recording settings help me produce better programs?
- High-quality recordings enable fast and efficient editing.
- Using a portable recorder allows you to leave the studio and conduct interviews in the field with farmers.
- Being familiar with your recorder will help you record the best sound for your purposes, whether it’s for an interview, wild sound, or music.
How do I get started?
- Learn your recorder’s functions and settings
- Monitor your levels during a recording
- Learn effective microphone techniques
- Use audio editing guides
Details
1. Learn your recorder’s functions and settings
File type
One of the most important settings on your recorder is the file type. Many portable recorders offer a variety of file types that save space on the recorder but sacrifice sound quality. These include .mp3, .wma and .m4a.
For the highest quality sound, select a post-code modulated signal (PCM). This will be labeled as PCM or .wav on your recorder. Keep in mind that PCM and .wav files take up more space. So make sure that you back up old recordings to ensure you have enough space for a new interview or a wild sound recording. For more information, read FRI’s broadcaster how-to guide on saving, organizing, and archiving audio files.
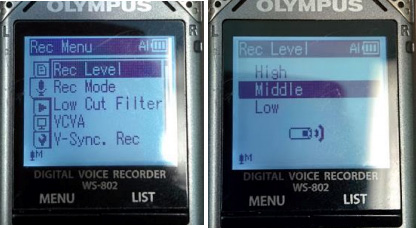
Recorder level
The recorder level is another important setting. If you record too low, you’ll have to increase the overall amplitude in the recording—which will add noise. If you record too high, you will “clip” the audio, which creates distortion that cannot be repaired.
Most portable recorders allow you to record on low, middle, or high. The best selection for most recordings is middle, but you still need to monitor your levels during a recording by wearing headphones and watching the screen. Start your recording and ask your interviewee to say their name and title. Monitor the levels and make adjustments as needed.
2. Monitor your levels during a recording
You can monitor your levels by watching the screen on your recorder while it’s in Rec mode. Depending on the cable you use, you might see a L and R (Left and Right) bar that moves up and down during the recording. The volume is measured in decibels (db) that can range from -40db (or lower) up to 0db. Recording levels below -25db will require you to boost the overall recording, and will result in undesirable noise.
It is best to avoid recording anything at or below -25db. Anything recorded above 0db will be “clipped” and be distorted and unusable. The ideal range is between -15db and -6db. More information on audio editing can be found on FRI’s BH2 on audio editing.
3. Learn effective microphone techniques
A quality microphone will ensure that you get the best quality recordings, both in the studio and in the field. Even a simple, low-cost microphone will drastically improve the quality of voice and wild sound recordings compared to using a recorder by itself. For more information, read FRI’s broadcasting how-to guide on using wild sound.
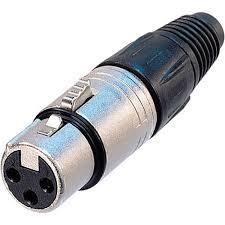
A typical handheld microphone has an XLR (“female”) connector at its base and a smaller 1/8” or “mini” (“male”) connector at the MIC jack. You will need a special cable to make the connection between the XLR and the MIC jacks. It is not recommended to use an adaptor as they can become loose, causing rumbling or crackling sounds—and they can even damage the jack on your recorder. The best length for a cable is 3-6 feet (1-2 metres).
4. Use audio editing guides
Finally, once you’ve obtained high quality recordings, you will need to edit these recordings. For detailed instructions, refer to FRI’s broadcaster how-to guide on audio editing. For a list of useful tutorials on popular editing software, click here.
Where else can I learn about recorder settings?
BBC, 19 February 2010, Tips on recording for radio. http://news.bbc.co.uk/2/hi/school_report/resources_for_teachers/8524006.stm
Definitions
Decibels (db) - Decibels are the unit of measurement for intensity of sound or loudness. The ideal range to record audio is between -15db and -6db.
PCM - PCM stands for pulse-code modulated signal. Select this setting for the highest quality sound. It will be labeled as PCM or .wav on a portable recorder.
XLR - An XLR is an electrical connector. The “female” end (pictured below) is at the base of a typical handheld microphone.
Acknowledgements
Contributed by: Maxine Betteridge-Moes, Agricultural Knowledge Management Advisor, Farm Radio International Ghana